Monday, June 1, 2015

Autoincrement Primary Key for Oracle

Autoincrement Primary Key for Oracle

A lot of databases has a column autoincrement attribute or an autoincrement data type. They are used to create unique identifiers for a column. In Oracle, you must use a Sequence in combination with a Trigger to get an autoincrement column. DeZign for Databases will automate the creation of an autoincrement column for you.
To make an Oracle autoincrement column in DeZign for Databases:
  1. Select Dictionary | Sequences from the application menu.
  2. In the Sequences dialog, add a new sequence (let's say Sequence_1). Press OK to save your changes.
  3. Go to the Entity dialog of the entity which owns the Attribute(column) you want to make autoincrement.
  4. Select the Attribute in the list of attributes.
  5. Select a numeric data type for the Attribute (NUMBER, INTEGER).
  6. Go to tab "Advanced" in the property editor at the bottom of the list of attributes.
  7. Select "Sequence_1" in the Apply sequence on attribute field.
  8. A "autoincrement" trigger will be created now automatically. This trigger will use the selected Sequence. Go to tab Triggers to see the generated trigger.
The generated trigger code:
CREATE OR REPLACE TRIGGER %triggername%
BEFORE INSERT ON %tablename% FOR EACH ROW
BEGIN
  SELECT %seqname%.NEXTVAL
  INTO :NEW.%columnname%
  FROM DUAL;
END;
%seqname% will be replaced with the name of the sequence when you generate the database.
%triggername% will be replaced with the name of the trigger when you generate the database.
%columnname% will be replaced with the name of the associated column when you generate the database.
Note that the sequence can be reused. You can use the same sequence on multiple columns if you want.
The generated trigger code is generated based on the template settings in the oracle definition file (oracle7.def, oracle8.def, oracle9.def, oracle10.def). The definition files are located in the Definitions subdirectory of DeZign for Databases' installation directory. 

Monday, December 8, 2014

Register Custom Table in ORACLE

DECLARE
   vc_appl_short_name   CONSTANT VARCHAR2 (40) := 'C_APPS';
   vc_tab_name          CONSTANT VARCHAR2 (32) := 'C_FND_INTERFACES';
   vc_tab_type          CONSTANT VARCHAR2 (50) := 'T';
   vc_next_extent       CONSTANT NUMBER        := 512;
   vc_pct_free          CONSTANT NUMBER        := 10;
   vc_pct_used          CONSTANT NUMBER        := 70;
BEGIN   -- Start Register Custom Table
   -- Get the table details in cursor
   FOR table_detail IN (SELECT table_name, tablespace_name, pct_free, pct_used,
                              ini_trans, max_trans, initial_extent,
                              next_extent
                          FROM dba_tables
                         WHERE table_name = vc_tab_name)
   LOOP
      -- Call the API to register table
      ad_dd.register_table (p_appl_short_name => vc_appl_short_name,
                            p_tab_name        => table_detail.table_name,
                            p_tab_type        => vc_tab_type,
                            p_next_extent     => NVL(table_detail.next_extent, vc_next_extent),
                            p_pct_free        => NVL(table_detail.pct_free, vc_pct_free),
                            p_pct_used        => NVL(table_detail.pct_used, vc_pct_used)
                           );
   END LOOP; -- End Register Custom Table

   -- Start Register Columns
   -- Get the column details of the table in cursor
   FOR table_columns IN (SELECT column_name, column_id, data_type, data_length,
                               nullable
                          FROM all_tab_columns
                         WHERE table_name = vc_tab_name)
   LOOP
      -- Call the API to register column
      ad_dd.register_column (p_appl_short_name      => vc_appl_short_name,
                             p_tab_name             => vc_tab_name,
                             p_col_name             => table_columns.column_name,
                             p_col_seq              => table_columns.column_id,
                             p_col_type             => table_columns.data_type,
                             p_col_width            => table_columns.data_length,
                             p_nullable             => table_columns.nullable,
                             p_translate            => 'N',
                             p_precision            => NULL,
                             p_scale                => NULL
                            );
   END LOOP;   -- End Register Columns
   -- Start Register Primary Key
   -- Get the primary key detail of the table in cursor
   FOR all_keys IN (SELECT constraint_name, table_name, constraint_type
                      FROM all_constraints
                     WHERE constraint_type = 'P' AND table_name = vc_tab_name)
   LOOP
      -- Call the API to register primary_key
      ad_dd.register_primary_key (p_appl_short_name      => vc_appl_short_name,
                                  p_key_name             => all_keys.constraint_name,
                                  p_tab_name             => all_keys.table_name,
                                  p_description          => 'Register primary key',
                                  p_key_type             => 'S',
                                  p_audit_flag           => 'N',
                                  p_enabled_flag         => 'Y'
                                 );
      -- Start Register Primary Key Column
      -- Get the primary key column detial in cursor
      FOR all_columns IN (SELECT column_name, POSITION
                            FROM dba_cons_columns
                           WHERE table_name = all_keys.table_name
                             AND constraint_name = all_keys.constraint_name)
      LOOP
         -- Call the API to register primary_key_column
         ad_dd.register_primary_key_column
                                     (p_appl_short_name      => vc_appl_short_name,
                                      p_key_name             => all_keys.constraint_name,
                                      p_tab_name             => all_keys.table_name,
                                      p_col_name             => all_columns.column_name,
                                      p_col_sequence         => all_columns.POSITION
                                     );
      END LOOP; -- End Register Primary Key Column
   END LOOP;    -- End Register Primary Key

   COMMIT;
END;

Let’s go and validate in application.
Navigate to Application Developer –> Application –> Database –> Table F11 –> Enter your table_name ‘C_FND_INTERFACES’ –> Ctrl + F11. Image 001 Image 002

Wednesday, December 3, 2014

DBMS_SCHEDULER examples

DBMS_SCHEDULER examples

May be interesting to some of you which haven't had the time testing and working with the DBMS_SCHEDULER. I collected some examples to show what is possible with that amazing tool.

DBMS_SCHEDULER is an internal Oracle package (since Version 10g) which provides database driven jobs.
It's divided into 3 parts:
  • Time schedule part - dbms_scheduler.create_schedule
  • Program declaration part - dbms_scheduler.create_program
  • Job (conflation) part -dbms_scheduler.create_job
Examples of the dbms_scheduler.create_schedule part:
  1. begin  
  2. -- daily from Monday to Sunday at 22:00 (10:00 p.m.)  
  3. dbms_scheduler.create_schedule  
  4. (schedule_name => 'INTERVAL_DAILY_2200',  
  5.  start_date=> trunc(sysdate)+18/24, -- start today 18:00 (06:00 p.m.)  
  6.  repeat_interval=> 'FREQ=DAILY; BYDAY=MON,TUE,WED,THU,FRI,SAT,SUN; BYHOUR=22;',  
  7.  comments=>'Runtime: Every day (Mon-Sun) at 22:00 o'clock');  
  8.   
  9. -- run every hour, every day  
  10. dbms_scheduler.create_schedule(    
  11. schedule_name  => 'INTERVAL_EVERY_HOUR',    
  12.   start_date    => trunc(sysdate)+18/24,    
  13.   repeat_interval => 'freq=HOURLY;interval=1',    
  14.   comments     => 'Runtime: Every day every hour');    
  15.   
  16. -- run every 5 minute, every day  
  17. dbms_scheduler.create_schedule(  
  18. schedule_name  => 'INTERVAL_EVERY_5_MINUTES',  
  19.   start_date    => trunc(sysdate)+18/24,  
  20.   repeat_interval => 'freq=MINUTELY;interval=5',  
  21.   comments     => 'Runtime: Every day all 5 minutes');  
  22.   
  23. -- run every minute, every day  
  24. dbms_scheduler.create_schedule(  
  25. schedule_name  => 'INTERVAL_EVERY_MINUTE',  
  26.   start_date    => trunc(sysdate)+18/24,  
  27.   repeat_interval => 'freq=MINUTELY;interval=1',  
  28.   comments     => 'Runtime: Every day every minute');  
  29.   
  30. -- run every Sunday at 18:00 (06:00 p.m.)  
  31. dbms_scheduler.create_schedule  
  32. (schedule_name => 'INTERVAL_EVERY_SUN_1800',  
  33.  start_date=> trunc(sysdate)+18/24,  
  34.  repeat_interval=> 'FREQ=DAILY; BYDAY=SUN; BYHOUR=18;',  
  35.  comments=>'Runtime: Run at 6pm every Sunday');  
  36. end;  

Example of the dbms_scheduler.create_program part:
  1. begin  
  2. -- Call a procedure of a database package  
  3. dbms_scheduler.create_program  
  4. (program_name=> 'PROG_COLLECT_SESS_DATA',  
  5.  program_type=> 'STORED_PROCEDURE',  
  6.  program_action=> 'pkg_collect_data.prc_session_data',  
  7.  enabled=>true,  
  8.  comments=>'Procedure to collect session information'  
  9.  );  
  10. end;  

Example of the dbms_scheduler.create_job part:
  1. begin  
  2. -- Connect both dbms_scheduler parts by creating the final job  
  3. dbms_scheduler.create_job  
  4.  (job_name => 'JOB_COLLECT_SESS_DATA',  
  5.   program_name=> 'PROG_COLLECT_SESS_DATA',  
  6.   schedule_name=>'INTERVAL_EVERY_5_MINUTES',  
  7.   enabled=>true,  
  8.   auto_drop=>false,  
  9.   comments=>'Job to collect data about session values every 5 minutes');  
  10. end;  

Examples to change dbms_scheduler settings:
  1. begin  
  2. -- change start time  
  3. DBMS_SCHEDULER.SET_ATTRIBUTE(  
  4.    name => 'INTERVAL_EVERY_5_MINUTES',  
  5.    attribute => 'start_date',  
  6.    value => to_date('22.06.2009 12:15','dd.mm.yyyy hh24:mi')  
  7. );  
  8.   
  9. -- change repeat interval  
  10. DBMS_SCHEDULER.SET_ATTRIBUTE(  
  11.    name => 'INTERVAL_EVERY_MINUTE',  
  12.    attribute => 'repeat_interval',  
  13.    value => 'freq=MINUTELY;interval=2'  
  14. );   
  15. end;  

Example to run job immediate:
  1. begin  
  2. dbms_scheduler.run_job('JOB_COLLECT_SESS_DATA',TRUE);  
  3. end;  

Example to restart job:
  1. begin  
  2. dbms_scheduler.disable('JOB_COLLECT_INST_INFO');  
  3. dbms_scheduler.enable('JOB_COLLECT_INST_INFO');  
  4. end;  

Select job status:
  1. -- All jobs  
  2. select * from user_scheduler_jobs;  
  3.   
  4. -- Get information to job  
  5. select * from user_scheduler_job_log order by log_date desc;  
  6.   
  7. -- Show details on job run  
  8. select * from user_scheduler_job_run_details;  

Wednesday, October 30, 2013

ORACLE Quote to Order Process flow

Quote to Sales Order cycle

Amala Silvester M

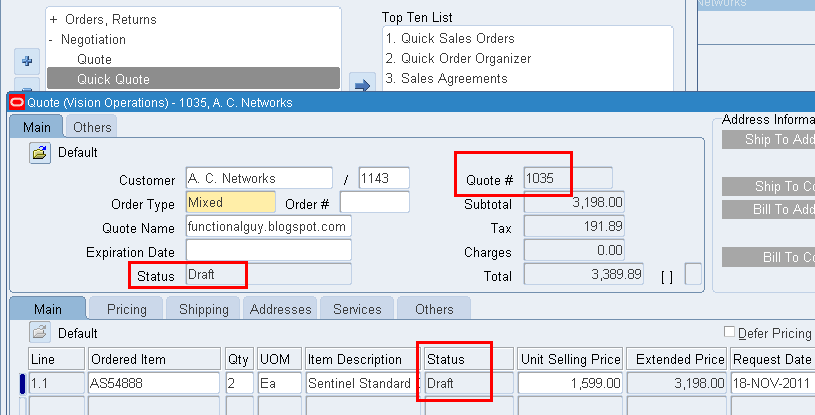
Oracle Quotes offers limited functionality to create Quotes and Progress it through the Negotiation phase and finally creates Sales Order. Within Order Management we can avail simple functionality like. (Create Quote > Submit for Internal Approval > Take Customer Acceptance).
In company has complex / advance quoting needs then Oracle Sales Quoting needs to be implemented.

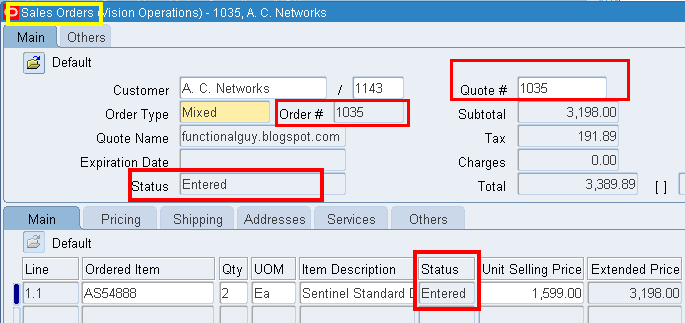
One more important point to be noted is data for Quote header/lines got inserted into OE_ORDER_HEADERS_ALL / OE_ORDER_LINES_ALL and same data will be used for order header /lines

Create Quote:
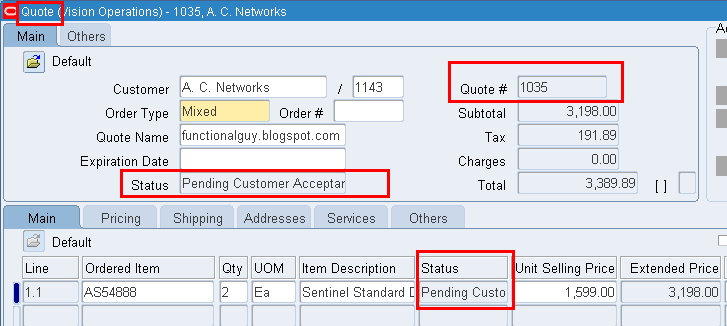
If you want then you can add Expiration date for the quote.
Initially quote remain in Draft status.

Submit for Internal Approval:
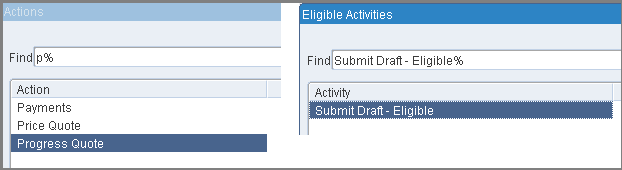
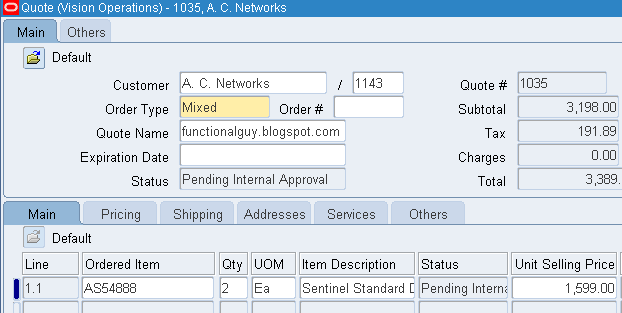
Once the draft is done then creator shall submit it for internal approval. This can be done from ‘Action’ button then select ‘Progress Quote’ and submit for approval.

Then the status becomes ‘Pending Internal Approval


WorkFlow:
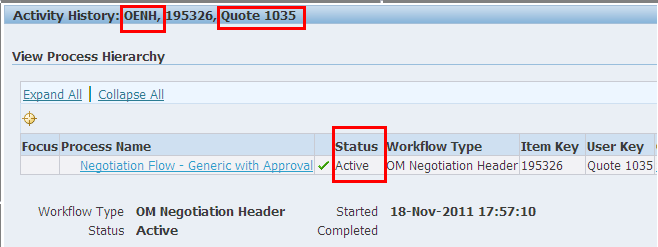
Remember the work flow associated to quote header only, there will be no Line level workflow associated in case of with Quote.
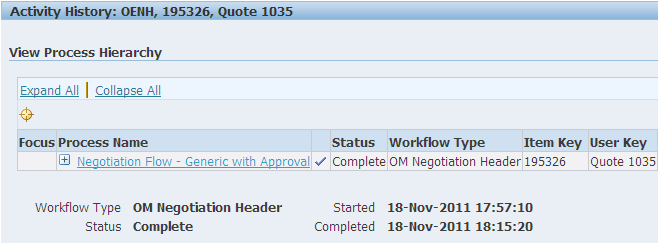
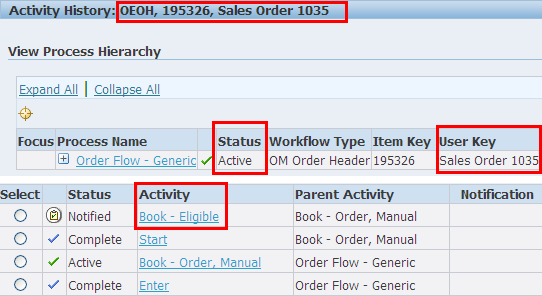
WF_ITEMS and WF_ITEM_ACTIVITY_STATUSES  with ITEM_TYPE ='OENH' , but once Quote got approved and converted to Orders , system will end date the workflow with ITEM_TYPE ='OENH' and creates new workflow with ITEM_TYPE ='OEOH'( for order header) and OEOL (for order lines).


Internal Approval:
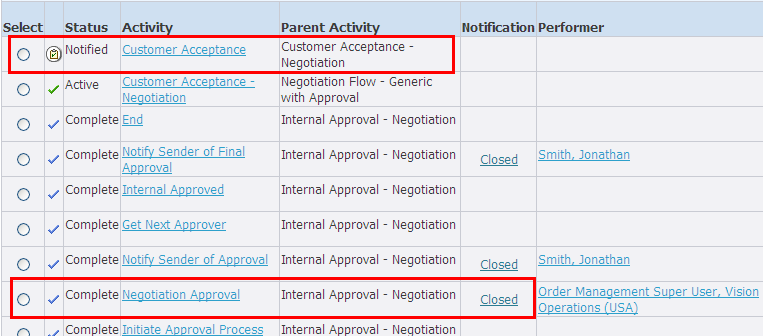
Now the WF is waiting for internal Approval. We can modify the WF to have some customization like send email notification to concerned person.

After the internal approval from the authorities, WF get moved further and wait for Customer Acceptance.

At this stage status of the quote becomes “Pending Customer Acceptance”.


Customer Acceptance:
After receiving confirmation from your customer you may take the appropriate action.
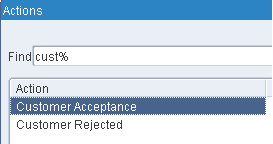
In our case, let’s say customer sent Acceptance. So go to ‘Actions’ button and select ‘Customer Acceptance’ option.

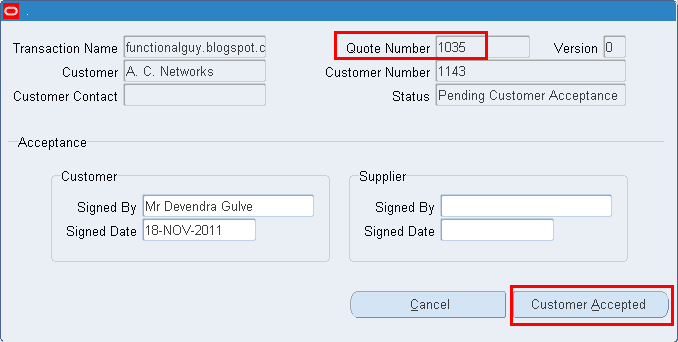
Here you can add details about who and when accepted the quote.

At this stage quote WF is completed and Sales Order WF starts for header as well as for order lines.


Sales Order get created automatically

Order Header Workflow will be as below


Order Line Workflow will be as below.

From this point sales order cycle starts…